Saturday, July 28, 2018

Week 5 - Documentation Week

My time at SSDC has come to an end, and so is Week 5. This has been a lot of fun!
Here's what I contributed to my team.

2018-07-22


On this day, I printed the last parts of the showcase model: the left side and the door. After that was finished, I worked on the documentation and the presentation that my teammates have started to work on.

2018-07-23


On this day, I worked on the documentation mostly, and a little bit of the presentation.

2018-07-24


On this day, my team and I finalized our last presentation and presented it. We continued working on the documentation. We will finish it by 2018-07-28.


Thursday, July 19, 2018

Week 4 - Prototype Week

Week 4, Prototype week, is about to end.
Here is what I contributed to my team.

I have a simple routine now: check if the printers are malfunctioning, then print parts for our subteam (and other subteams as well).

2018-07-16


On this day, the Prusa got jammed: at first, I thought the extruder was clogged, but the situation was much easier to fix than expected. How the Prusa puts filament into the extruder is simple: the filament enters a hole on the top and clamped into place by a small gear and a ball bearing. The filament passes through a small tube in the bottom towards the extruder, where it is heated up and extruded onto the build plate. This information is important because filament got jammed between the gear-and-ball-bearing system and the extruder itself. Once I replaced the new filament, I stuck a small allen wrench / allen key into the tube and forced the remaining stuck filament out of the extruder. After performing a test print, the Prusa was ready to go once more.

2018-07-17


On this day, the Lulzbot needed to be recalibrated, which is a tedious process involving going back and forth between computer and print bed, making sure the bed is level to the nozzle. In order to make sure that the bed was truly level, I made a couple more one-layer test prints on the first layer to check.

2018-07-18


On this day, the Prusa printer needed recalibration - the P.I.N.D.A. (Prusa INDuctive Autoleveling) sensor was way too far from the print bed, which caused the distance between the bed and nozzle to be at least 1 mm apart. In order to fix this, Eric and I slowly adjusted the sensor until the distance could be fixed easier. Once the printing bed is close enough to the nozzle, the Live Z Adjust feature on the Prusa can be used for sub-1mm adjustments. This is what we use for quick recalibration for special specific filament settings.

While my team performed the simulated drop test and added windows to our functional model, I printed more parts for the showcase model: the middle-top shell part as well as all of the internal furniture that we designed in the first couple of weeks.

2018-07-19


On this day, my team and I started working on the final presentation. While that was going on, I printed the middle-bottom shell. We ran out of screws for this project: fortunately, in the shops, there were screws of similar size and shape that we could use temporarily (or in the showcase model instead).

Thursday, July 12, 2018

Week 3 - Assembly Week

Week 3, Assembly week, is about to end.
Here's what I contributed to my team.

2018-07-09


I began to print the remaining parts for the new cabin design. Once those were up and ready, I practiced with my team for our presentation. Once the parts were printed, we had three of the four printed parts available. By the time the Lulzbot finished printing, there wasn't enough filament to print another part.

2018-07-10


On this day, I used the Prusa printer to print the top part of our cabin assembly, leaving the Lulzbot TAZ available for testing with the green Octave filament. This specific spool of filament is frustrating to use, because it needs different settings than the other filament spools.

I made multiple tests trying to print the first two layers of a 50mm × 50mm sheet of plastic.

The first print with the Octave had large ripples in the first layer, which I later figured out meant that the distance between the nozzle and the print bed was too close.

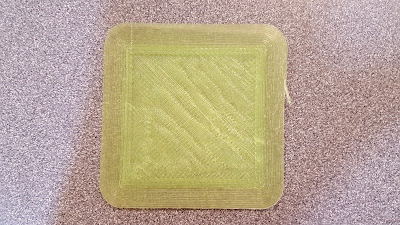
First print, with Octave Green PLA

I replaced the filament with gold and raised the extruder-to-plate distance to see if that changed anything: it did! Between prints, I raised the nozzle further and further.

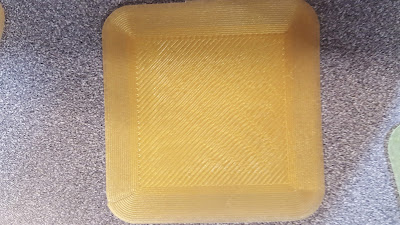
Second print, with Hatchbox Gold PLA
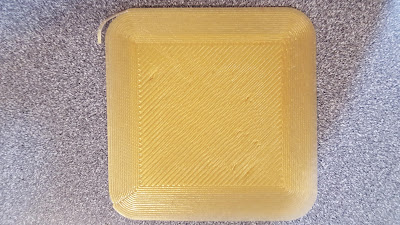
Third print, with Hatchbox Gold PLA
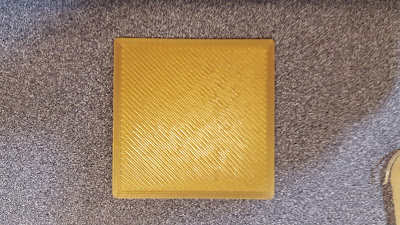
Fourth print, with Hatchbox Gold PLA
However, I decided to try to use the Octave filament again the next day.

2018-07-11


On this day, I finally figured out how to use the Octave filament. With the same settings before with the fourth print from the previous day, the Octave filament didn't stick and warped. This meant that there was too much distance between the print nozzle and the filament bed. In order to fix this, I changed the initial height of the first layer only using the First layer height setting in Cura. For 0.2mm layer prints, the first layer is set to 0.3 mm. I changed hat to 0.2 mm, and the print quality of the Octave filament increased dramatically.

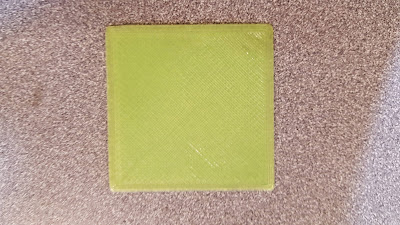
Fifth print, with Octave Green PLA
 To test the dimensional accuracy with the filament, I printed a small 3D benchmark called 3DBenchy. The TAZ Lulzbot was pretty accurate to the STL file dimensions.

Our 3DBenchy, in all its glory
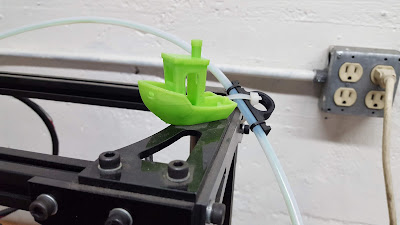
Our team redid our bill of materials to include a set of size 608 bearings, because we were going to make better filament holders for both printers. The new filament holders will prevent filament under-extrusion, which is a problem that the Lulzbot has with its parts.

2018-07-12


Today, the hardware for our cabin model came, some brass screw inserts designed to fit in plastic. After putting the inserts in and assembling everything, our first cabin model was complete. Now, all we have to do is test it!


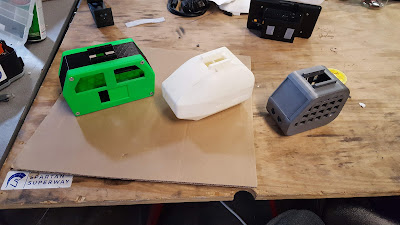
Our model (left), the 2017-18 model (center), and the legacy model (right)


Thursday, July 5, 2018

Week 2 - Finalize Week

Week 2, Finalize week, is over.
Here's what I contributed to my team.

2018-07-02


On this day, I was told that the presentation that we might make would be postponed to next week. My team and I began an inventory list of all of the rolls of filament we have on-site, and whether we needed to buy new rolls.

We began to start testing the printers more with more parts to print, but with the green filament from Octane we couldn't do much. I began to get tired of printing test part after test part to see if the faulty filament would actually print something useful. At the end of the day, I deleted all of the settings on the Prusa 3D printer, which was a huge mistake.

2018-07-03


On this day, I reset the printer's settings twice, once with the faulty Octane filament and once more with some black filament. The filament didn't stick to the printing bed and instead stuck to the extruder itself. This is an extreme case and only happens when the nozzle is way too far away from the print bed.

I printed extra feet for the Lulzbot TAZ and fixed its printing bed. It still has a large gash on the side, so our printing space will definitely be limited. Nevertheless, this will still increase our production by literally twofold.

2018-07-04


Fourth of July. No work.

2018-07-05


On this day, Arushi and I set up the two printers side-by-side. The Prusa printer was set for printing the bottom of our podcar design, while the Lulzbot was going to print the side car. The Prusa worked efficiently and didn't need much tending to, while the Lulzbot failed four times before finally getting it right.
  1. Extrusion Jam
  2. Not sticking to bed
  3. Disconnected from computer
  4. Disconnected from computer
  5. Success!
Everyone is working on their presentations for Monday. I'm looking forward to see the progress the other teams made.


Thursday, June 28, 2018

Week 1 - Design Week

Week 1, Design Week, is about to end.
Here's what I contributed to my team.

2018-06-25


Arushi, Ben, and I used the measurements that I gathered from the previous days and compared the scales between the three models we had: the green conceptual design from the Swedish team, the full-scale bogie model's placeholder cart, and the current small-scale iteration of the pod car. 

We determined that the average small-scale to green design dimension ratio was 1:14.84, and the average small-scale to full-scale placeholder dimension ratio was 1:10.8. The average of these two ratios is 1:12.8, which wouldn't be a nice number to work with.

My team and I created a true 1:10 scale cardboard cutout of the dimensions we measured of the green conceptual design. We also created the average US male and female heights, about 5' 10" and 5' 4" respectively [1]. We made 40 cm x 50 cm scaled-down "seats" as well.


2018-06-26


I found the American Public Transit Association's Standard Bus Procurement Guidelines [2][3], and used those to find out how tall the cabin's interior really should be: APTA bus guidelines state that the bus must have an interior headroom of 74 inches the back, and 78 inches in the front. 78 inches is close to 200 cm, and the green model's exterior height wouldn't fit within that standard.

The four of us also thought of how we would put a bike into the cabin, with concepts including:
  • Putting the bike behind the seats
  • Moving the door to one side to allow enough space for a bike rack
  • Having a foldable part of the cabin extend to hold a bike
  • Using foldable seats for more bike space.
Daniel found some articles on the ergonomics of personal rapid transit [4][5][6][7][8], while I focused on checking our 3D printers' printing error.

I used our lab's Prusa i3 Mk2 3D printer to print a small 25mm cube with a 15mm diameter hole. Below is a picture of the Prusa printer mid-print. The test cube's X- and Y- dimensions were at most 0.09 mm larger, but the Z-dimension was 0.25 mm larger. The inner diameter hole was 0.66mm smaller. This might cause some trouble with making joined pieces, but we can fight that error with well-designed pieces and extra contingency.


The Lulzbot TAZ wasn't calibrated properly, so I didn't test it yet.

2018-06-27


Arushi, Ben and I did some more measuring: this time it was the usable seats that were in one of the first concept designs for the Superway. After measuring, I created a 10:1 scale design that we could use that would be ready to print easily. However, during the print we noticed that the whole entire 1/10 scale would be too big for the Prusa printer to make on its own, and canceled the print. 

I found my 3D-printed model from last year.

With some quick Google Sheets equations and locked cell references (shortcut is F4), I created a scale chart with possible dimensions all from 1:1 scale to 1:25 scale. basing our measurements off of the scaled green model 20th scale, we made a conclusion.

We've chosen these for our full & 20th scale.
L (mm)3800.0190.0
W (mm)1700.085.0
H (mm)2200.0110.0

It's good to know that we've finally figured out how big we're going to make the cabin.

2018-06-28


I found Solidworks CAD files of all of the hardware parts used on McMaster-Carr, and started to write this blog post. 

I also taught Arushi how to use the 3D printer and Cura, the software we use to turn STL files into GCODE files for printing. We printed a small file that she had been working on for SolidWorks practice.

I checked over what we had to do next week and started adding the parts we need to our Bill Of Materials (BOM). Since we're the small-scale team, most of the parts we need -- screws, nuts, bolts, filament, and so on -- are easy to find and already provided here. 

I updated the Trello page we had to reflect on what we had done during these four days. I'm looking forward to next week, Finalize Week.

Sources


I will eventually compile these into MLA citations for our presentation, but for now here are the direct links.
  • [1] https://www.firstinarchitecture.co.uk/average-male-and-female-dimensions/ 
  • [2] http://www.apta.com/resources/reportsandpublications/Documents/hfdiesel.pdf
  • [3] http://www.apta.com/resources/reportsandpublications/Pages/BusParatransit.aspx
  • [4] https://waset.org/publications/10008176/analysis-of-train-passenger-seat-using-ergonomic-function-deployment-method
  • [5] http://www.diva-portal.org/smash/get/diva2:832377/FULLTEXT02.pdf
  • [6] https://www.iosh.co.uk/~/media/Documents/Networks/Branch/Edinburgh/Vehicle%20ergonomics%2011Oct12.pdf?la=en
  • [7] https://www.recovre.com.au/wp-content/uploads/2014/08/Vehicle-Ergonomics-Fact-Sheet.pdf
  • [8] http://www.wt.pw.edu.pl/content/download/2836/17245/file/Z98-art_8.pdf

Tuesday, June 19, 2018

SSDC Orientation 3

Our team, Small-Scale Vehicle Design, was first to present. Professor Furman said that we did really well, and Ron Swenson said that our Gantt chart was the easiest to read because it had easily visible font and was split into five different slides.

There's nothing else to do except get ready for the real deal.

Thursday, June 14, 2018

SSDC Orientation 2

Between 2018-06-05 and 2018-06-12, I helped contribute to this blog and my team's blog. My team and I also set up a Slack Group for communication and a Trello Group for tracking assignments and objectives.

Today, Professor Furman showed us the Assertion-Evidence presentation method for making good technical presentations. My team and I created a Gantt chart early and started to research other examples of personal rapid transit.

On 2018-06-19, my team will be presenting our finds through a lightning talk, a five-minute presentation that explains what we're doing, why we're doing it, and how we're going to do it. We will be using the Assertion-Evidence presentation method for this presentation.